
Then I tried my first pattern, the flower girl dress, and realized that beauty really is only skin deep. Now settle in with a cup of something soothing because this is a long one.
Moving on to the fabric requirements and cutting diagram. Like Elise, I found these to be a bit off. The pattern doesn’t indicate the width of fabric required just a length of one yard. If you’re using a typical 44/45” wide quilting weight cotton there is no way to place the pattern pieces on a yard of fabric so that the lengthwise grain runs the length of the garment. And that was using the largest pattern pieces provided in the book, not my enlarged pieces. So I channeled Tim Gunn and made it work by cutting a contrasting band of white to add to the bottom of the dress skirt. If you cut these bands at double the length you need you can iron them in half, attach to the skirt bottom and avoid needing to hem the garment.

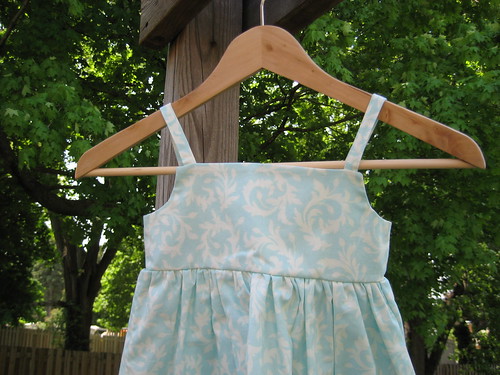
Where to put the straps you ask? Good question. It’s not marked on the pattern so I made a guess. I sandwiched one end of each strap between the exterior and lining piece on one side of the bodice. I then stitched a seam around the top of the bodice. I clipped into the seams around the curved bits and turned the bodice right side out.
At this point I was pretty annoyed with the instructions so I didn’t even bother trying to follow the rest of the pattern as written. Instead I just went with what I knew from Amy and Leisl. I attached the contrasting bands to the bottom of my skirt panels and then attached the front and back panels, finishing the seams. (I used the serger-like stitch that is on my Bernina though a zig-zag will also work.) At this point I marked the centers of my bodice and centers of my skirt (again no marking provided on the pattern). At the top of the skirt I sewed in two rows of basting stitches less than ½ inch from the top. Then I gathered the skirt until it was the same width as the bodice. With right sides together, I matched up the markings on the bodice and skirt and attached with a ½ inch seam. I finished the edges like above.
At this point I needed to fit the dress on the girl to figure out how long those straps really needed to be and where to place a buttonhole. (One of the errata indicates that it’s impossible to get the dress on and off without either snaps or buttons.) You can use whatever method is your favorite for making buttonholes and sewing on buttons. I chose to hide mine. The straps button on the inside of the back bodice.
Are you still reading? I hope so. I wanted to give as much detail as I could on how I made sense of the construction of this dress. Because this is such a lovely book to pick up and look through I’m sure it’s drawing in lots of people who are new to sewing. Without any previous sewing experience though I worry that poorly written instructions and diagrams will turn off those new sewers forever. And I just can’t let that happen. Sewing is just too rewarding an experience. I’m hoping that the editors of this book are taking the reviews to heart and are busily working on the second edition. I understand that mistakes happen but I cannot imagine how so many errors made it through the entire book process. It’s sad and disappointing.

2 comments:
I am just about to get started on this, sizing up for my birdlike 6 year old. I am so glad I read your comments and will proceed with caution :-)
I just finished my dress - with difficulties similar to yours... However - your dress is darling!
Post a Comment