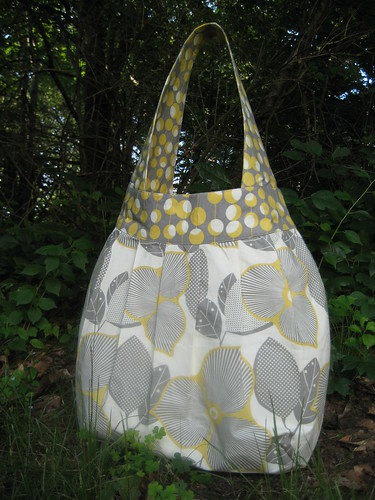
I awoke with high hopes for quickly turning out my
birdie sling in a morning sewing session. Described as a beginner sewing project I figured I’d have no trouble finishing it in about four hours time since I’d prepared the
fabrics and interfacing the day before. The birdie sling, however, had different plans for me. It decided to teach me patience. It also taught me to trust my instincts, but more on that later.
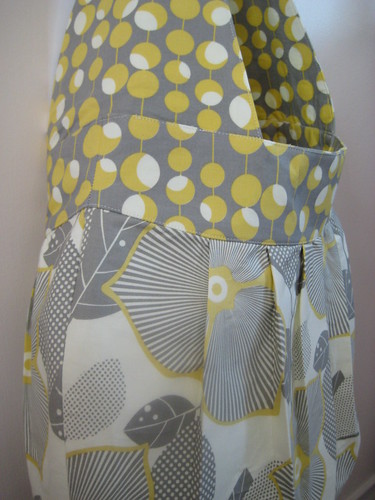
The initial sewing went smoothly. I prepared the pockets and attached them to the lining. I made the pleats on the exterior panels. I even jumped ahead and made the handle. It was attaching the bands to the exterior and lining panels that got me. I attached all four bands upside down! Out came the seam ripper and a choice word or two.

Trying to get all the fabric on the top raw edge of the exterior panel to match up with a lot less fabric on the bottom raw edge of the band was a bit frustrating. Using the same method as in making my
sun hat, I notched the bottom raw edge of the bands nearly to the seam allowance and with lots of pinning I made it work. Experience and patience really paid off here; the lining panels and the exterior panels matched perfectly.
After a few hours break from the project (a must when things aren’t going too well) the rest of the bag went together pretty easily. One thing I didn’t particularly like were the instructions for creating the gusset. It’s not the pattern it’s me. In theory it should be simple enough. Just a few measurements and connect the marks with a gently curving line. Unless it’s a straight line and I'm using a ruler I have great trouble replicating the same gentle curve four times.
A few other suggestions for finishing your bag: Baste the handles on the bag with a ¼” seam rather than a ½” seam. This allows you some room for error when you attach the exterior and lining with a ½” seam. I would also suggest that you trim the seam allowances to ¼” on the bands and handle before attaching the lining and exterior. If you don’t I found that the seams were too bulky.
So where should I have trusted my instincts you ask? Well, at the very beginning when a nagging little voice told me to skip the fusible interfacing in favor of sew-in interfacing. Sew-in interfacing is used in the
Frenchy bag pattern and I love how
those turn out. What I really like about the sew-in interfacing is that it provides strength without stiffness, keeping the feel of fabric. The fusible interfacing did not do this. The bag is too stiff for my tastesand has lost the fabric feel that I love in these types of bags.
My first instinct was that this would be my first and last birdie sling but I'm reconsidering. I may attempt another using sew-in interfacing with quilting weight fabric or forgo interfacing altogether by using decorator weight fabrics as
Elise did. On the bright side this bag is huge. It really is a perfect summer carry-all. It would easily fit a couple of beach towels, a beach blanket, reading materials, a small feast, and enough sunscreen to keep sunburn at bay. Now if only I could work up the courage to go to the beach.


3 comments:
I've loved reading about your Ambitious Weekend project so much - you did loads! A Birdie Sling pattern is in my own To Sew pile so thanks for the tips.
I've written about your blog on mine - and passed on the Just Plain Fun To Read award to you - you can go and grab the jpeg from my blog if you want to pass it on.
When I made mine I used Pellon's fusible SF101 for both the shell and the lining and it worked great.
Your bag looks great!!
Jeannie
Great job! It turned out super cute!
Post a Comment